NextITS pipeline, full-length ITS 
This example data analysis follows the NextITS pipeline as implemented in PipeCraft2’s pre-compiled pipelines panel. NextITS is a specialized pipeline for analyzing full-length ITS reads obtained via PacBio sequencing.
Starting point
The example dataset consists of PacBio full-length ITS sequences from two sequencing runs.
Key features of the data:
Demultiplexed fastq files.
Two sequencing runs (Run_01 and Run_02).
Files follow the
RunID__SampleIDnaming convention.
Directory structure:
To process data with NextITS in PipeCraft2, your input directory must follow a specific structure:
A main folder (e.g.,
my_NextITS_project).Inside that, a folder named exactly
Input.Inside
Input, subfolders for each sequencing run (e.g.,Run_01,Run_02).Inside run folders, your demultiplexed fastq files.
my_NextITS_project/       <-- SELECT THIS AS WORKING DIRECTORY
└── Input/
    ├── Run_01/
    │   ├── Run01__Sample101.fastq.gz
    │   ├── Run01__Sample49.fastq.gz
    │   └── Run01__Sample72.fastq.gz
    └── Run_02/
        ├── Run02__Sample26.fastq.gz
        ├── Run02__Sample61.fastq.gz
        └── Run02__Sample87.fastq.gz
Note
The double underscore __ in filenames (e.g., Run01__Sample101) is important!
It allows the pipeline to parse the Run ID and Sample ID correctly, which is crucial for tracking samples across runs and for tag-jump filtering.
Select pipeline and input
SELECT PIPELINE –> NextITS.SELECT WORKDIRmy_NextITS_project) that contains the Input directory.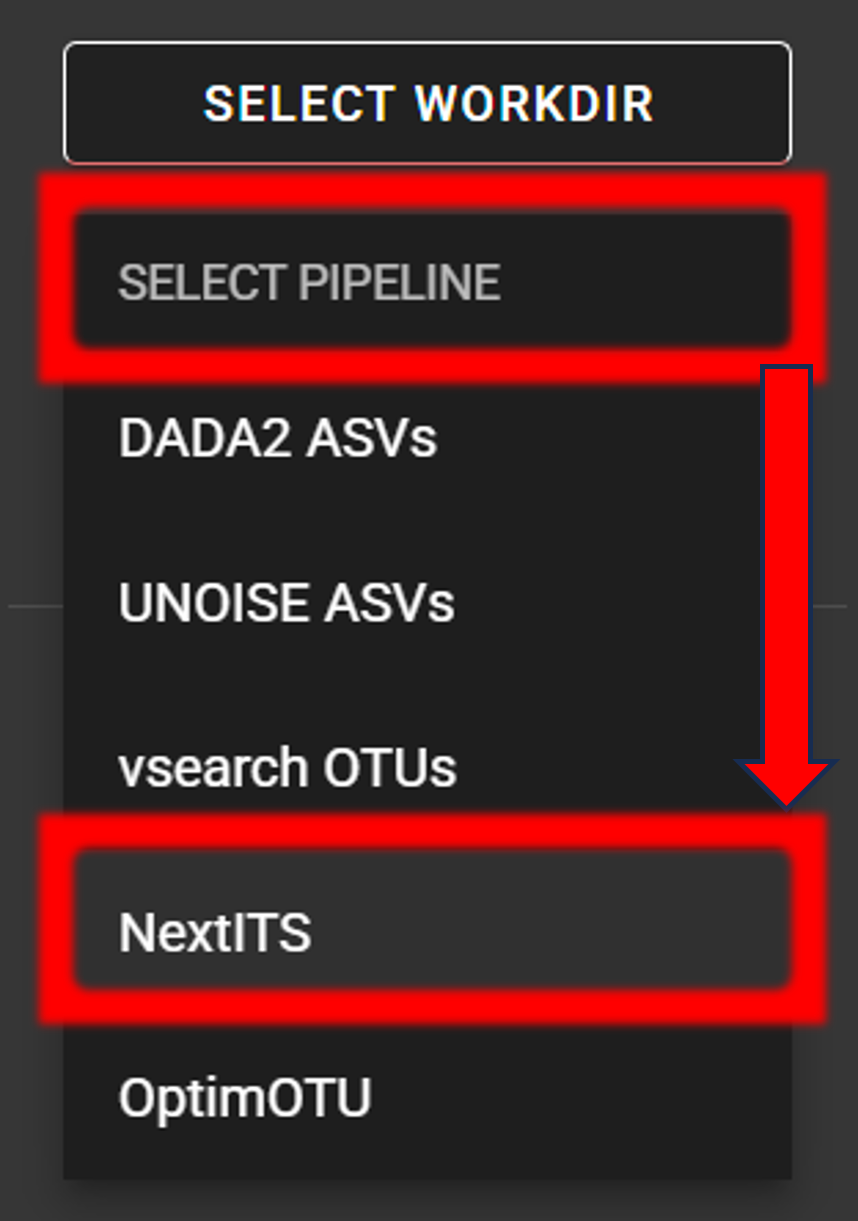
Step 1: Quality control and artefact removal
NextITS processes data in two distinct steps. Step 1 is performed per sequencing run to handle run-specific errors and artefacts.
Step 1 includes:
Primer trimming: Removing primers and filtering reads that don’t contain them.
Quality filtering: Removing low-quality reads and correcting homopolymer errors (common in PacBio data).
ITS extraction: Using ITSx to extract the full ITS region (ITS1-5.8S-ITS2), removing flanking 18S/28S parts.
Chimera filtering: De novo and reference-based chimera detection, with a “rescue” step for likely false positives.
Tag-jump correction: Removing sequences that likely jumped between samples during library prep.
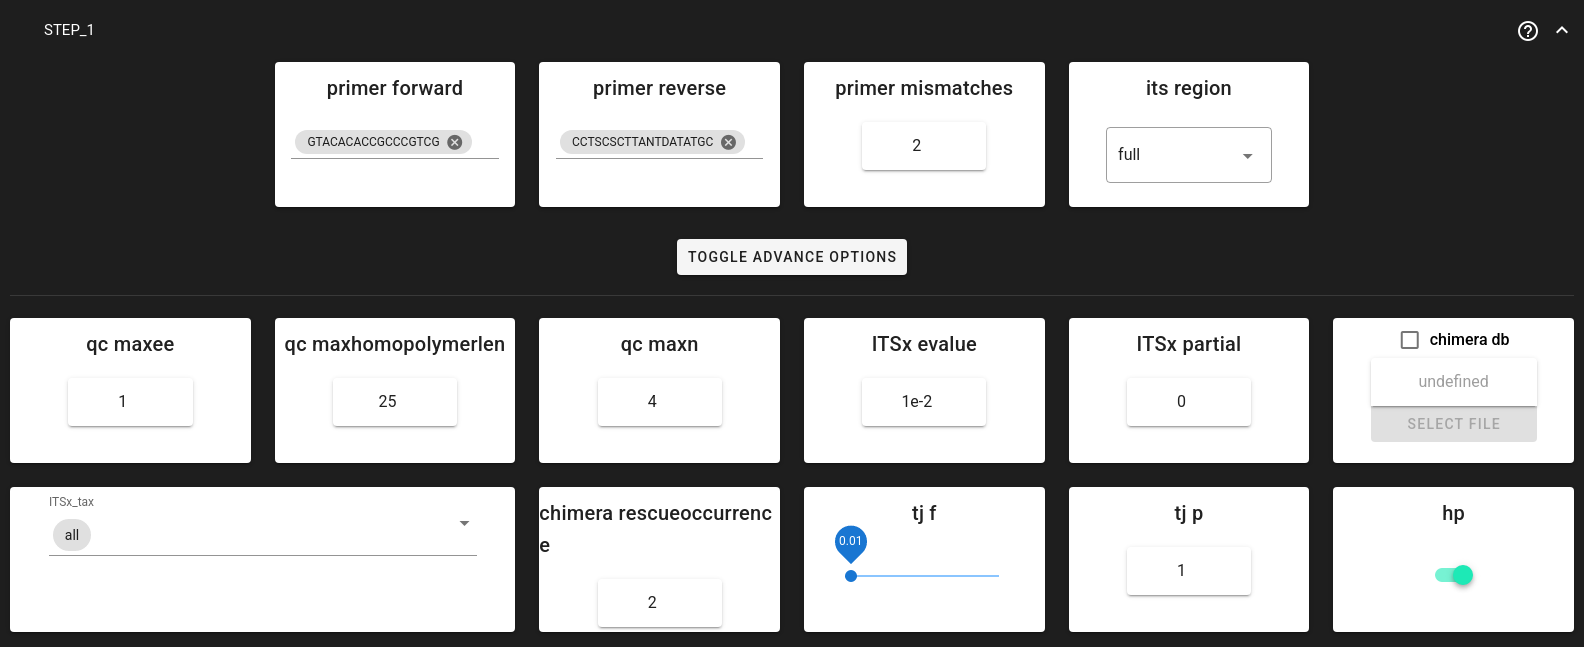
Key Settings for Step 1:
Trim Primers: NextITS requires exactly one forward and one reverse primer.
primer_forward: Specify your forward primer (IUPAC codes allowed).primer_reverse: Specify your reverse primer.primer_mismatch: Allowed mismatches (default 2).
ITS Extraction:
its_region: Generally set to full for PacBio data to keep the entire ITS region.ITSx_tax: Can be set to all, Fungi, or other groups to restrict ITSx search.
Chimera Filtering:
Uses a built-in or custom reference database.
chimera_rescue_occurrence: Sequences initially flagged as chimeric but appearing in at least this many samples (default 2) are “rescued” (considered valid). This protects against false positives in multi-sample datasets.
Tag-jump Correction:
Important to remove erroneous reads (assigned to wrong samples).
tj_f(f-value): Expected tag-jump rate. Default 0.01 is often appropriate for dual-indexed libraries. Use 0.03 or higher for combinational dual indexing if tag-jumping is suspected to be higher.
Step 2: Aggregation and clustering
After Step 1 processes each run individually, Step 2 pools all valid sequences from all runs and clusters them into OTUs.
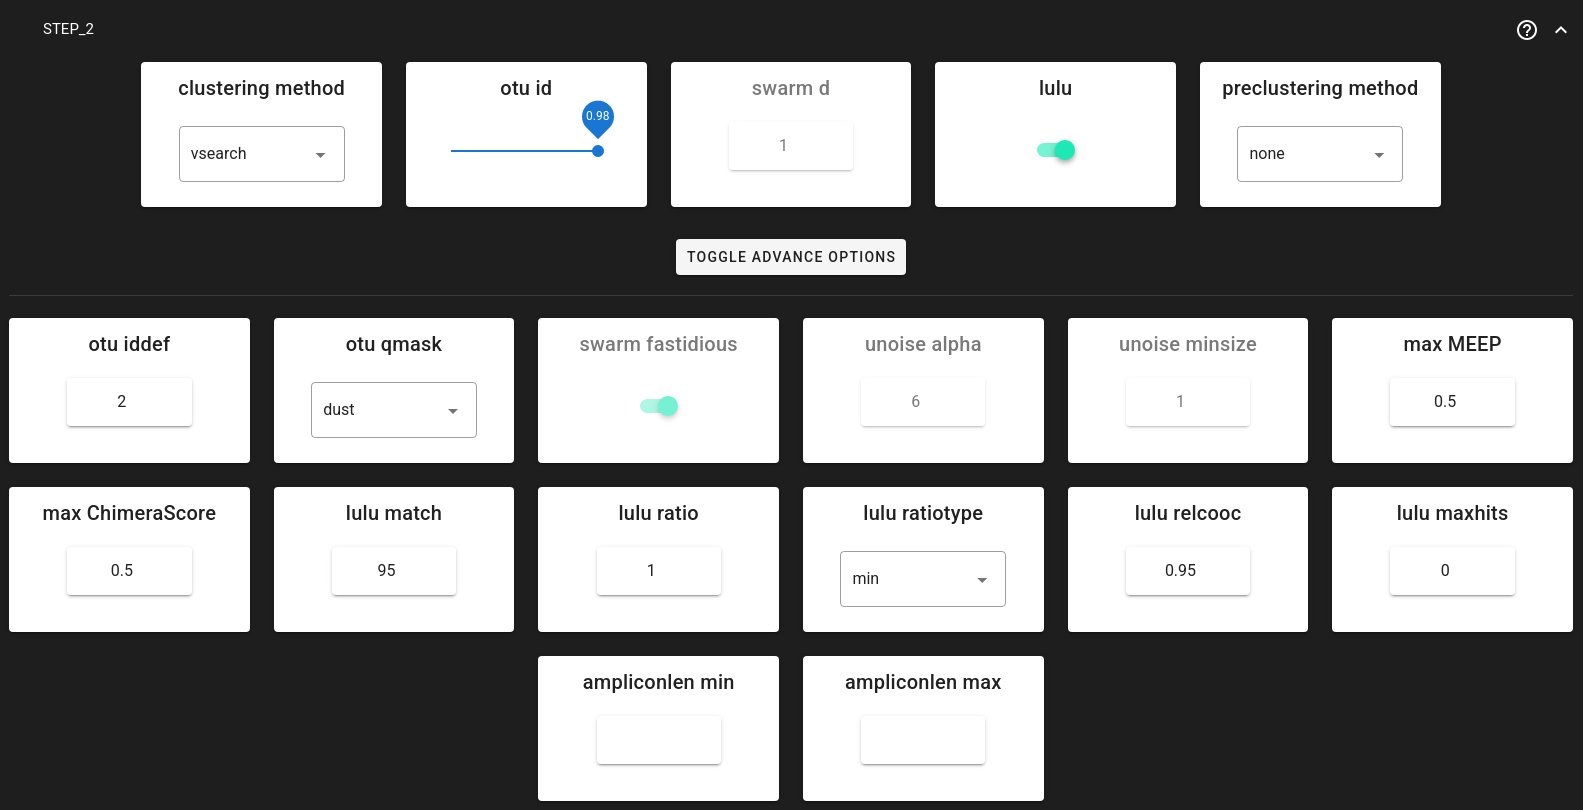
Clustering Options:
You can choose between three clustering strategies via clustering_method:
vsearch (default): Greedy clustering at a fixed threshold (e.g., 0.98 for 98% similarity). Fast and widely used.
swarm: Exact-sequence based clustering that forms OTUs by chaining sequences differing by d nucleotides. Good for high-resolution analysis.
unoise: Denoising algorithm (zero-radius OTUs or zOTUs are analogous to ASVs).
Post-clustering LULU:
lulu= TRUE (default).LULU merges “daughter” OTUs (errors) into “parent” OTUs based on co-occurrence patterns, producing a cleaner final OTU table.
Save and start
Once settings are configured:
Save the configuration: Click the Save Workflow button
 on the right ribbon. This creates a
 pipecraft2_last_run_configuration.jsonfile for reproducibility.Start the pipeline: Click START.
First time run
When running NextITS for the first time, PipeCraft will pull the necessary Docker images. This may take a few minutes.

Examine the outputs
NextITS organizes outputs into Step1_Results and Step2_Results.
Note
Both Step 1 and Step 2 output directories contain a pipeline_info folder.
This folder includes execution_trace_*.txt with the detailed log of the pipeline execution (e.g., duration and resources used per each process),
as well as README_Step{1,2}_Methods.txt with the human-readable description (suitable for materials and methods of a publication) of the pipeline steps with references to software tools used.
Step 1 outputs (per run)
Located in Step1_Results/Run_XX/. Key folders include:
02_PrimerCheck: Sequences after primer trimming.03_ITSx: Results from ITS extraction (ITS sequences, coordinates).05_Chimera: Chimera filtering results (chimeras found vs. non-chimeras).06_TagJumpFiltration: Results after removing tag-jump artefacts.07_SeqTable: Final processed sequences for this run. These are used as input for Step 2.08_RunSummary: ContainsRun_summary.xlsxwith read counts per sample at each step. Check this to evaluate sample quality and dropout.
Step 2 outputs (pooled)
Located in Step2_Results/. This is where your final results are stored.
01.Dereplicated: Pooled and dereplicated sequences from all runs.03.Clustered_VSEARCH(or Swarm/UNOISE): Raw clusters before LULU curation.04.PooledResults: *OTUs.fa.gz: Representative OTU sequences. *OTU_table_wide.txt.gz: OTU table (OTUs x Samples).05.LULU(if LULU was enabled): * OTUs_LULU.fa.gz: Final curated OTU sequences. * OTU_table_LULU.txt.gz: Final curated OTU table. *LULU_merging_statistics.txt.gz: Info on which OTUs were merged.
If required, RData files can be loaded into R using readRDS function, e.g.:
OTU_table <- readRDS("Step2_Results/04.PooledResults/OTU_table_long.RData")
Important
For downstream analysis (taxonomy assignment, statistics), use the files in the 05.LULU folder (if enabled) or 04.PooledResults (if LULU was disabled).
Taxonomy assignment
Taxonomy assignment is not part of the core NextITS pipeline but can be run subsequently using QuickTools. See here.